Thursday, February 23, 2012

It's here! My makeup board tutorial!

YAY! I made something from a Pinterest pin! Who REALLY does that?!

So my last blog entry was talking about my redunkulous amount of makeup I have, and how I don't use it because it's all buried under each other. PROBLEM SOLVED. And here's how I did it.

I went to Joann's one night while my wonderful husband was having a guys night out, playing poker. With wine and Mad Men season 3 waiting for me at home, I decided to stop at Joann's and get what I needed. I am lazy, (as you can see from how often I post, ha ha) so I decided to not go the "go to Lowes and get some sheet metal and have them cut it, blah blah blah" route, so I had to think fast. What else could I do?

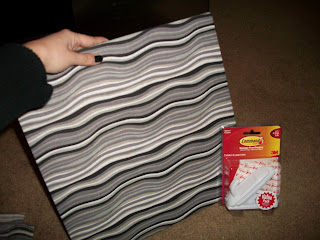
DRY ERASE BOARD. Those suckers are magnetic! So, I got one of those, a square of fabric that matched the decor of the room, Aleene's Tacky Glue, some hooks, and a roll of magnet, and went home. (Total cost: about $15.)


STEP ONE. Glue on the fabric to the back of the board (Pull the material tight!):


This is what it looked like once the material was on.

Then, with the hooks shown above, I attached them to the back of the board (You'll see why I needed hooks in a bit):

Next, magnet the crap out of your cosmetics. (The following picture shows the individual dot magnets, but I recommend getting it by the roll. It's stronger.)


TAAA DAAAA! I had myself a makeup board!


Sweet, right?
The dresser I use as a vanity has a bar, I am guess for towels or something. I dunno, it's an antique. ANYWAY, that's why I needed hooks.
So, I was done with this in like, 30 minutes, tops. My husband was still doing his thing, Don Draper was still doing his thing, and I still had a bottle of Cupcake wine to drink. So, I continued with the crafting.

Next, I grabbed a mason jar from my wedding, a funky hook I randomly found, and a piece of left over fabric from the board. I got this:

MAKEUP BRUSH HOLDER!

I was on a roll.


Alas, it still wasn't enough. Where would I put my lipsticks and lipglosses?

This was a basket thingie that was given to us at Christmas that was filled with candy. Now it's filled with lip stuff.

I was done for the night. I was satisfied...

UNTIL, I realized that I still had a crap ton of stuff I wanted up.

A week later, a baby board was born.

I am obviously out of space, sooo I am done with the makeup crafting ;)

It has been super beneficial for me to have this, though. I am using products that I have never touched before, and taking full advantage of the fact that I am very blessed with all of these options!
And the best part is, I actually have room to get ready in the morning!


Wednesday, February 1, 2012

My "Natural" Look- DIY Board teaser & My feature on somethingturquoise.com

Hello loves! So for a few weeks now, I have been wanting to do something about the abundance of cosmetics I have. My makeup box is literally THROWING UP makeup. LOOK AT THIS!!!

This is not even HALF of what I own. This is probably about 15%, in fact. Using everything I own can be an issue, especially when you forget about stuff you own, like eyeshadows or blushes. If you're anything like me, you get bored of the same look, and want to change it up. It makes it easier to do that when you have everything out and in sight, and organized.

Thanks to the magic of Pinterest, I came across an awesome DIY project. Of course I pinned it, but like most pins, you kind of leave it there and forget about it.

Then, today, as I was at work, my friend Ellie who is a majorly crafty person (check out her awesome blog HERE) and I were talking about my stash. She asked "WHY do you need so much in the first place?!" and I said, "Lady, my natural look consists of 4 DIFFERENT LIP PRODUCTS, that's why!"

Oh boy... did reality hit. Seriously, 4 lip products for my "natural" look?! Granted, I wear more than the average woman. What can I say, I'm a makeup artist fo' life. So anyway, after realizing that the amount of product I own will not be tampered with, I have decided to make this board. It is pretty much a magnetic frame that will hold my shadows, blushes and misc. items that I will stick a magnet to. When we finish the final product, I will make sure to post it here.

So back to my natural look. What I wore today totalled 14 items:
Moisturizer- (Super By. Dr. Perricone)
Primer (Super by Dr. Perricone)
Eye Cream (Super by Dr. Perricone)
Cream eyeshadow (Urban Decay- color: Rehab)
Mascara (Maybelline- The Falsies Volum' Express in Very Black)
Tinted Moisturizer (Dermalogica in Light)
Concealer (Studio Fix Fluid, which I use as a concealer, even though it's a foundation. NC 30)
Mineral Powder (Bare Minerals in Med. Beige)
Eyebrow filler (Taupe powder, Trucco)
Blush (Coastal Scents in Redwood, a warm mauve)
and finally, lips-
Lip Primer (Skin Medica Lip Renewal)
Lipstick (MAC's Vegas Volt)
2nd Lipstick (MAC's Ravishing)
Lipgloss (Urban Decay's Lip Junkie in Midnight Cowboy)

PHEWWWW!

Here was my end result:


See, for me, this is the most comfortable I can be without packing on the color. I have very dark under eye circles, pale skin, and no pigmentation on my lips. Many woman feel that I have the gift of applying makeup well, but I feel as though woman have an advantage over me, being able to feel comfortable enough to not have to wear makeup daily.
Truly natural and the option to take it or leave it is the real gift.


On another note, I wanted to share my wedding feature from somethingturquoise.com
I was lucky enough to have this feature done last Saturday, and I was so flattered that Jen picked our wedding!
Here's the direct link:
It's awesome to have all of our hard work recognized :)

That's all for now! Until next time.

Tuesday, January 17, 2012

SUPER by Dr. Perricone

Hello all! I have been so awful at updating this. But, since the wedding is done...oh yeah, got married! Anyway, since that is done, I have much more time to update this much more frequently. Hopefully I stick with that, ha ha! Anyway, I am going to write today about my experience with Dr. Perricone's new product line, SUPER.

First I will say that I had a hell of a time getting this at Sephora. I wanted a set, because if I am going to give this line a try, I would like to try a few things. It was sold out in stores and online. OK, good sign. I then went to the direct website, getsuper.com. They offered many different sets. I choose this one:
This set came with O-Mega Moisture, Bright Eyed, and Sweet Clean cleanser.

Lets start with the moisturizer-
I really like this one because even though it's for dry skin, it doesn't feel heavy what so ever! The active ingredient in this one is Chia.
Chia delivers more Omega-3 than flax or fish, satisfying skin’s craving for moisture. It definitely complements my skin after an OCM wash.
 
Second, is the eye cream, Bright Eyed-
This is a cream that brightens and firms around the eyes. Now, although it's only been about a week since I have been using this, I have yet to see any "brightness". But, that is to be expected this early on in using a product. My eyes surely need the brightening, so lets hope it does! It does, however, firm. And, its great as a primer for my eyeshadow primer! Let me explain... When I put a primer on my eyelids, it doesn't glide as well as I would like usually. I don't normally care since I will be putting eyeshadow over it, but now with this new cream, it makes everything glide evenly, without creasing the primer or shadow. Hopefully I am making sense here! Anyway, active ingredient is Melon. Melon is a skin-saving superfood, who knew!?

Lastly, the skin cleanser. I have not used this yet since I am using cleansers very rarely now that I have discovered OCM. I am waiting to finish up my Dr. Perricone cleanser that I am currently using before I start this one, but here are the stats.
Sweet Clean Cleanser 
A gentle cleanser that wipes out dirt and makeup
Packed with Acai, an exotic antioxidant from the Amazon
Ideal for all skin types.

Now, I have to discuss my issue with the shipping. It was not the best experience. The order was placed before NYE, and did not arrive until last week. When I emailed asking why A. there was no record of my purchase on my account online, and B. why I had no notification about when my order would ship, the response I got was "everyone was on vacation. Sorry." Ehh, I get that NYE is a holiday, but really? A WEEK OFF? And no notice to people who have purchased items online? Not cool. Also, the day I received the package was the day my card was "officially" charged. Meaning, almost 3 weeks later, they charged my card the total amount, when I thought I had been charged immediately after placing the order. Sure, I had the funds, BUT, what if I didn't? Anyway, some things to look out for if you try this product out. Will I purchase from them again? Yes, because I will always sacrifice bad customer service for good skin.


OH! Did I mention I got murrried?!?!


Yaaaaaaaaaaaaaaaaaaayyyyyy!!!!!!!!!!!!!!!

Friday, November 11, 2011

Urban Decay has amazing sales!

So I just went shopping online, and wanted to share with you the AWESOME deal I just got on Urban Decay.com! They seriously have insane sale prices all the time, and I think that slowly, surely, my makeup kit is going to be taken over by this line.

Here's what I purchased today:
2- Vintage Urban defense Tinted moisturizers (Retail: $32.00, Sale Price: $4.00) 
_____________________________
2- Cream shadows (Retail: $17.00, Sale Price: $2.00)
In Delinquent...
And Mushroom.
 _____________________________


1- Tinted, Sunless self tanner (Retail: $28.00, Sale Price: $2.00)
_____________________________
Color: Protest

1-Loose Pigment (Retail: $20.00, Sale Price: $1.00)
_____________________________
Jilted Lipstick
1-Lipstick (Retail: 22.00, Free gift for me!!!!)

Retail total: $168.00

MY TOTAL: $15!!! (Not including shipping, which was an extra $7.00)
WOO HOOOOO!!!!

I have used many Urban Decay products, including the All Nighter Spray (keeps your makeup on all night. GREAT for brides!)
Razor Sharp finishing powder (I use this as a touch up. Super convenient packaging!)
Lip Junkie lip gloss (awesome minty taste!)
and the Eyeshadow Primer potion (One of the best eye shadow primers around.)

There is a kit on sale RIGHT NOW called the Urban Bride kit; it's $24, and it has the last 4 items just described, plus a mascara and some lickable/sparkling body powder in Marshmallow!

Happy Shopping! :)

Wednesday, November 9, 2011

Jillian Michaels is going to KICK MY ASSSS

So with about 38 days left until my wedding day, I have decided to take it up a notch and get toned and sexy for the Honeymoon. So, I am starting the Jillian Michaels' Ripped in 30 program. It is based off of her system of 3,2,1. (3 min strength, 2 min cardio, 1 min abs.) I hope to get some kind of tone in more like 20 days, but we'll see. I will also have to follow a pretty strict diet, and that means I am leaving my current low carb diet for a variation of what she recommends. This is the plan I will be following:
MORNINGS: Steel cut oatmeal with dried cranberries and raisins. (No sugar! But, I tried it today, and it was actually pretty good!) Or, a FiberOne bar.
SNACKS: Popchips (My favorite is the salt and pepper flavor. So yummy!) Or Walnuts/Pecans
LUNCH: Veggie or Chicken sandwiches (All veggies, no cheese, no salt, and especially no mayo!!!)
Or, if I really need something salty, a light soup (Chicken noodle, asparagus) and salad, balsamic dressing.
DINNER: Salmon, chicken breast, or steak. Yup, that's about it.

Of course, this is just a simple layout of what I plan to do, and I am pretty sure I can stick to this for at least a month, but, no promises :)

Anyway, on to some beauty. Let's talk about Birchbox again. I feel like I haven't really talked about the wonderful program as much as I intended to when I first started this blog. I have been sent 2 items from Blinc


Mascara (the Tubing kind) and Eyeliner (the "peel off" kind.) I love the eyeliner, in fact, I am saving what is left for it for the wedding, because it's waterproof ;) It really does kind of peel off of your eye, too. A little bit of warm water, and it rubs right off!
The mascara, however, not so much. It's way too thin for my taste. I love the "I have fake lashes" look, without really wearing fake lashes. Sure, it's cool that it comes off in tubes, but that's about the best thing about it.

In October, I got something called the Lash Card.
I found this to be a pretty interesting thing, it's a card that blocks your eyelid so that you can put on your mascara without getting it on your eyeshadow. I do this to my self all the time. It's so annoying and frustration. The tip to getting renegade mascara off of your lids without messing up you eyeshadow is by "scratching" it off once it is completely dry. The problem with this is
A. I don't have disposable mascara wands hanging around all the time to use for scratching off (best for this technique.)
B. I don't have time to wait for it to dry.
So, this is a really good invention, HOWEVER... I can't see myself paying for these mascara blockers. Call me crazy, but I'd rather get an old business card (old makeup artist trick, I think this is where the invention stemmed from, actually) and use that. This is also an item that I am saving for wedding day. Can't be too careful, and since I have it, I might as well use it for something important.

Lastly, I will review an item I got back in September, that I just ran out of.
Jurlique Purely Age-Defying Firm and Lift Cream. I used this expecting it not to be as good as what I already use for a firming cream (Dr. Perricone, remember? The $120 cream?) Well, it works just as good. Funny story, since I am still doing the OCM treatments, when I put this cream on my nose, the little gunk that I have left in my pores kind of comes out with this cream since it's firming the skin so well. Gross, I know. Anyway, when I looked it up to see if it's cheaper, I come to find that although yes. it is cheaper, it's still $70. BOOOOO... I need to find a cheap, pore reducing, gunk extracting cream!!!
I am expecting a new box this week, so I will keep you posted on the additional goodies I get.
OH! And, if you are thinking about checking out Birchbox for yourself, let them know I referred you!


See ya!

Wednesday, October 26, 2011

Halloween Fashion Show!

Hey everyone! It's been a while! A lot has been going on lately, with the wedding being so close, we've been preparing my big move, and also trying to keep my Fiance' sane while he goes through midterms! :)

On to the beauty. Last week I was fortunate enough to work on a Halloween fashion show with my good friend, and wedding makeup artist, Clarisa Martinez. She is the owner of Beauty and Charm Artistry, and she does everything from weddings, to fashion shows, to make up classes! She's one bad ass lady, ya'll.
Here's her Facebook site, if you want to see more of her work:


So, we had a total of 8 looks. All Halloween inspired, with a beauty focus.

Look #1- Heather as the Diva
Makeup by Clarisa Martinez
Look #2- Alexis in Dia De Los Muertos
Makeup by Clarisa Martinez
Look #3- Joanne as the Vampire
Makeup by Clarisa Martinez
Look #4- Marissa in "Chanel #5" (A contoured focus look)
Makeup by Me, Sketchgirly ;)
Look #5- Rae as a Pin-Up Zombie
Makeup by Clarisa Martinez
Look #6- Sandy as Dita Von Teese

Makeup by Clarisa Martinez

Look #7- Raquel as the Peacock
Makeup by Clarisa Martinez
and, Last but not Least...

Look #8- Ashton as the Superhero

Makeup by Me, Sketchgirly

Here's a group shot. I have no clue who that random guy is! LOL!

Anyway, there you have it. This was my Halloween fix for the year. If you are in CA, I would strongly recommend looking Clarisa up and taking one of her classes!

I'd also like to mention Mary and Trina of Hair and Makeup Dazzle (Dolce Studio) provided the awesome hair styling for the show. You can find them on the Beauty and Charm Facebook page!
Also gotta give credit to Clarisa's assistants, Priscilla and Queanna.
Lastly, thanks to Entice Media Group for the pictures! Yay for pictures!

In the center, Trina, Mary and Clarisa. I am missing because I was too busy somewhere else apparently. LOL!

Monday, October 3, 2011

A week of OCM

Hello! It's been a while, but I have been holding on the posting mainly because I have been experimenting with a new method of cleansing my face. I've been using oil. Yeah, weird, right? This is how it all went down...

I was on The Knot a few weeks ago and got into a conversation about.... well I don't remember what, but one of the girls (J&K, *thanks, BTW*,) had mentioned that she does the oil cleansing method. Me, always looking for ways to improve my skin, asked what the heck she was talking about. She basically told me how she does it and where to look for more info. Google is a girl's best friend.

After quite a few searches, some hesitation, and finally sacking up to do it, I ordered what I felt would be best for my skin and went from there. Here's how it works:

Oil cleansing is done by using blend of oils (do some research like I did to determine what you should use for your skin type,) and massaging them into your dry, dirty face. This method does replace your cleanser. It's pretty important to know that, because if you try using both, you could really do a number on your face! Soooo don't.

Here's a step by step:
1. Mix your oils *I use about a teaspoon of Jojoba Oil with 4 drops of Castor Oil. This is because I have combo skin, and I am also playing it SUPER SAFE. Castor Oil can be really drying and can really give your skin a strong reaction, I've read people who have broken out a lot, or have had rough patches on their faces after using too much in their first week . *
2. Take oil mixture and massage it into your face, using an upwards motion. I like to do it for at least 30 seconds. I also like to make sure that all of the makeup I am wearing has come off the first time around.
3. Take a hand towel, run some really warm water on it (as warm or hot as you can stand it,) wring it out, and put it on your face for again, about 30 secs.
4. Rub off excess oils.
5. If you have oil remaining on your skin, repeat steps 2-4.

You're done! In about 2-3 minutes, you have just given yourself what I like to think of as a mini facial.

I am doing this EVERY NIGHT. Why? Because I wear makeup everyday. I have to admit, I did use a sulfate free cleanser on the 5th day, in the morning, because of the fact that I didn't have my oils handy.

So, why does this work, you may ask...well, it's simple. You are basically replacing the bad oils on your skin with good, nourishing oils. Have you ever heard that when you dye your hair, and you get a spot on your skin, that you can use some of your unused hair dye to clean off the stain from hair dye on your skin? Yeah, same thing. "Like dissolves Like". Yeahhhh... I got all smart on ya'll... *Ok, you can thank my Fiances' knowledge of chemistry for that! ;)

So, there it is. I am one week in, and my skin feels AWESOME. My pores are shrinking, my skin is NOT oily, and it's soooo soft! I will say this, though; I am breaking out a bit. This is to be expected, since my skin is basically "purging" from all the bad oils that remain in my skin. Nothing too bad, but I feel like I should let you know so that you're not here thinking that I have perfected this technique, versus everyone else in Internet land that have had different experiences. Well, I hope I've covered everything. I am obviously open to questions you may have with my experience in doing this, but do your own research to get a good idea of what you are dealing with in doing this.

Til next time!