Sunday, April 15, 2012

GIVEAWAY!!!!

Well hello everyone! Today is the big day. The final day of the vanillabeangirls.com blogaversary giveaway! HURAAAYYY!!! Oh... you don't know what I am talking about? Well, I just so happen to be a part of this awesome 3 day giveaway. Here's the link to my prize:


Here is what is up for grabs:

For your face-

The Balm Plump lip gloss, and Dr. Brandt samples
For your nails-

Sally Hansen Nail Effects Nail strips and Zoya Nail polish mini
For your hair-

Phillip B. Finishing and Conditioning Cream, & Aussie Smoothing Serum
And, finally, so you're not all pasty lookin'-

Urban Decay Santa Tanita Face and Body self tanner foam

 Per Ellie, here's how you can enter:

*Be a follower of the Vanilla Bean Girls blog
*Like the Vanilla Bean Girls on Facebook
*Be a follower of Sketchgirly
*Share the giveaway on Facebook or Twitter
Make sure to leave comments below for each entry!
The winner for today's giveaway will be chosen at random and posted on April 19th!


Wednesday, March 7, 2012

15 minute up-do's (Thank you, Yahoo!)

A couple of days ago, Yahoo! had an article on 3 step hair styles. One caught my eye:
So cute, right!?!? So, I made sure to Pin it on Pinterest (of course) and titled it "for my dirty hair days."
Well, today was a dirty hair day, so I put this to the test. Here's what I got:

STEP 1: Divide hair into 3 sections, and braid.


STEP 2: Roll braids and pin

(yes, you can see the rubber bands holding the tails of the braids.
No worries, more bobby pins fixed this.)

STEP 3: Spray and smooth out/pin any loose ends.


ALL DONE!!!


So, I got that done so quick, it was like 15 minutes, and that's with all of the picture taking I was doing :)

So when I got home from work today, I started thinking; I could TOTALLY do a side triple knot!


You'll probably notice that one braid (top braid) is cut short . Since I have layers, I had to only braid the hair half way to make sure I caught all of the hair. Again, last frame shows the hair ties. Whatever, bobby pins fix it.


SEE?! Taaa daaaa...

So, some tips for you if you decide to do this yourself:

1. Make sure you have plenty of bobby pins. At least 4 for each twist. That's what I ended up using.

2. When pinning the hair, make sure not to try and pin too much hair at once. Since it's braided, thinner pieces of hair through the bobby pin will be enough to keep the twists on your head :)

3. Use thinner hair ties. This was a total experiment for me, so I was not prepared. I will probably use the clear rubber bands next time I try this. I am sure it will make it much easier to hide.

Side knots are TOTALLY happening when I am in Las Vegas next week. WOO HOOO!!!


Sunday, March 4, 2012

Fixin' my amazing shoes. (Craft stuff)

I loved everything about what I wore at my wedding. Custom dress, custom birl cage veil, hand made brooch bouquet... and the one thing that I wore that I actually paid for were the shoes of my dreams...

Oh, my wonderful Vivienne Westwood Dragon Lady shoes. (Yes, they're Vivienne Westwood for Melissa shoes, but to me, they will always be Viviennes.)
I went through hell and back looking for these shoes. I HAD to wear them on my wedding day, and I NEEDED to have them because, of course, I would totally wear these over and over again!
After months and months of searching, I found them. $180 + shipping from Brazil later, they were mine. Now, keep in mind, I would never EVER pay more than $60 for shoes. It's just not me. Not judging anyone who WOULD, but I'm a budget girl. And I wear shoes out like crazy, so it just does not make sense for me. Anyway, I preserved my shoes until the day before my wedding, as practice wearing them in the mud and icy dirt. The only issue? My sweet niece stepped on one of my feet. No biggie, right?

Cut to wedding day, I am coming down the aisle, and in the middle of everything, the top of the shoe got kicked off by my other foot.

Sighhhh.... You have no idea how much THAT hurt.

Well, I found some flats in the same style
So I bought 2 pair. 

I now own 2 and a half pairs of these type of shoes.

I can't get over the fact that I lost out of numerous wears for my wedding shoes, so I came up with a plan.

Buy ANOTHER pair of the heeled style. (I know, ANOTHER PAIR ;) )
Now, these are significantly cheaper than my first pair. Don't know why... not gonna ask questions.
See, my plan is to rip off the hearts to these as well. Since they didn't cost over $200, I feel like I can.
Then, I started prepping my purple shoes.


What you see here is some E-6000, some snaps, and the shoes.


I filed the back of the heart and the top of the shoe to make it rough.


I then glued on the snaps.


So, as for 24-72 hours, I let it dry.

YAAAYYYYY! Now I just wait for the other shoes to come in to get the other heart to interchange between the 2 pairs.

And that's my crafty craft for the month. I'll let you know if they last this way.

**IF ANYONE KNOWS A BETTER ADHESIVE FOR THIS TYPE OF PROJECT, PLEASE LET ME KNOW!**
I've heard excellent stuff about this glue, which is why I purchased it.

WISH ME LUCK!


Tuesday, February 28, 2012

Gel nail DIY and Nail Appliques

I loveeee doing my nails. I love getting creative with them, and wearing fun, funky colors. I also like to change it up quite a bit. But, not daily. And, unfortunately for me, my nail polish chips within HOURS of a nail polish application. It's so frustrating! I've purchased all the good brands, (OPI, Zoya, Butter London AND Essie all go to shiz immediately!) So, I've invested in a UV light, and a Gelac kit.
SOURCE
I love this kit! All of the colors are GORGEOUS and it is sooo easy to use!
So, last night I decided to get a little creative, and using Gelac's Blue Suede gel, and some other colors, I came up with this:

You'll notice my ring and thumb are a different color. That is IBD's Sultry Soul, a pot gel lacquer. There is a reason I have not raved about that one. It peeled completely off (ALL nails that I applied it on) within hours. I woke up this morning with 2 little purple nail gels on my pillow HA HA!
The glitter I used was by Sinful Color, in Frenzy, which is a purple and blue glitter mix.
I was so pissed off at all 4 nails that had the purple falling off that I threw that pot away. What crap! Luckily, I got it for free, so no harm.
Back to Gelac. It's so easy to use. 2 coats of color, leaving them under the UV light about 2 min. each time, plus 1 top coat under the UV light, at about 5 minutes, and you've got yourself awesome nails.

I've had to re-do my nails today since it looked weird having 4 bare nails while the rest were blue, so I just painted them all blue:
MUCH better. This will last about a week, and start to peel off. That is perfect for me. I can't commit to blue for longer than that!

I got my UV light from Ebay, and paid about 20 bucks for it. The Gelac kit was purchased on Amazon, for about the same amount. When you think about it, you're paying about $20 for a gel manicure a pop, so this is for sure a steal.

Another thing I use is nail appliques. Butter London have the CUTEST designs!

I am saving the Give/Take nails for Vegas next month, and plan on putting a Gelac clear top coat to make sure they last (The package says they're only good for like 2 days.)

My nail appliques of preference these
Not only do these stay on for about a week, but there is also enough to do your toes! AND they last about a month on your toes! So awesome, and so easy.

Lastly, please for the love of all that is holy, do NOT order nail appliques from fabulousnails.com. I'm still waiting for an order placed in early December to come, and there is NO way to get a hold of customer service. They simply will not reply. I was pretty much ripped off, and am working on getting my money back. Grrrr...


Saturday, February 25, 2012

BB Creams, and why I love 'em.

NEW OBSESSION ALERT.
I luv BB Creams. So much so, that I purposely spelled "love" wrong, in efforts to be all mushy about my love for BB Cream.

Why? Because I can finally wear something that makes me look like I am NOT wearing foundation! AND, my skin looks healthy! So much so, that I am willing to let you all take a peek at what I look like semi-naked face.

What I am about to show you is a comparison of 2 different BB Creams.

One, purchased online (Ebay) by the name of Skin79, Crystal Pearl cream
(It has a cool flip top with a highlighter cream on it, and also the actual cream is pearly, so it gives you a dewy look.)

And, second, given to my by the wonderful, and generous Kara (TKMB)
Missha BB Cream #23 
(This one is not pearly, but man does it have awesome coverage!)

And now... to compare.
As I am sure I've mentioned before, I have very dark circles under my eyes. What you see here is my face split between the 2 BB Creams. The left side has on Skin79's version, and the right is Missha.
Skin79's side
Missha's side

Clearly, Missha's coverage is solid. All I need is some loose powder to set it, and I am perfectly comfortable wearing it like that. Skin79's, on the other hand, does require more product to get it covering those dark circles under my eyes that I hate so much. Still, I love how it makes the rest of my face look. It gives me major glow.

So, if you're looking for coverage, go with Missha's brand. Highlighting and a glowy/dewy complexion? Skin79 is for you. If you're anything like me, and like to mix it up from day to day, get both. I totally alternate both creams because I am a cosmetic commitment-phobe.

Oh! I almost forgot! I took pictures of how they look with a full application! Here you go...

This is me wearing Skin79, with Bare Minerals in Light to set it. I am wearing it heavier around the eyes to keep me from looking like a raccoon.

This is a Missha application, with a much lighter setting of Bare Minerals in Light. Notice the difference in glow AND tone from both pictures? I assure you, it's not (just) the lack of lighting OR a good camera. Missha makes me look lighter, and Skin79 makes me look dewy and much more natural. All while still looking like I don't have a ton of face makeup on.

Now, I have not tried the American versions of these products, yet. But, I know many lines are either coming out with, or already have them on the market. MAC, Smashbox, Too Faced, Clinique, and many other lines have their own versions of this product that originates from Asia. Sephora carries all but the MAC version of the American BB Creams listed.

Hey, look at that, 2 post in one week. I'm getting better at this! See you in 2 months! Just kidding.

OH! Before I go, I'd like to mention that our wedding will be featured in Sunday, Feb. 26th's L.A. Times! (<--- Shameless promotion right thurrrr.) For those of you keeping score, that's 3 features! Holy cow, I hate it when my sister is right. (She predicted this. Which is why she put so much effort into our wedding. She also did because she loves us, of course.) I will make sure to post some pictures of it, since I'm sure you're not sick of my wedding pictures yet. Right? RIGHT?!

Thursday, February 23, 2012

It's here! My makeup board tutorial!

YAY! I made something from a Pinterest pin! Who REALLY does that?!

So my last blog entry was talking about my redunkulous amount of makeup I have, and how I don't use it because it's all buried under each other. PROBLEM SOLVED. And here's how I did it.

I went to Joann's one night while my wonderful husband was having a guys night out, playing poker. With wine and Mad Men season 3 waiting for me at home, I decided to stop at Joann's and get what I needed. I am lazy, (as you can see from how often I post, ha ha) so I decided to not go the "go to Lowes and get some sheet metal and have them cut it, blah blah blah" route, so I had to think fast. What else could I do?

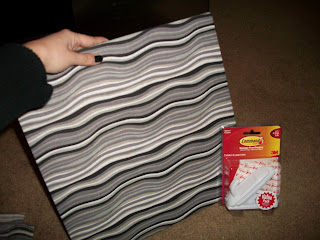
DRY ERASE BOARD. Those suckers are magnetic! So, I got one of those, a square of fabric that matched the decor of the room, Aleene's Tacky Glue, some hooks, and a roll of magnet, and went home. (Total cost: about $15.)


STEP ONE. Glue on the fabric to the back of the board (Pull the material tight!):


This is what it looked like once the material was on.

Then, with the hooks shown above, I attached them to the back of the board (You'll see why I needed hooks in a bit):

Next, magnet the crap out of your cosmetics. (The following picture shows the individual dot magnets, but I recommend getting it by the roll. It's stronger.)


TAAA DAAAA! I had myself a makeup board!


Sweet, right?
The dresser I use as a vanity has a bar, I am guess for towels or something. I dunno, it's an antique. ANYWAY, that's why I needed hooks.
So, I was done with this in like, 30 minutes, tops. My husband was still doing his thing, Don Draper was still doing his thing, and I still had a bottle of Cupcake wine to drink. So, I continued with the crafting.

Next, I grabbed a mason jar from my wedding, a funky hook I randomly found, and a piece of left over fabric from the board. I got this:

MAKEUP BRUSH HOLDER!

I was on a roll.


Alas, it still wasn't enough. Where would I put my lipsticks and lipglosses?

This was a basket thingie that was given to us at Christmas that was filled with candy. Now it's filled with lip stuff.

I was done for the night. I was satisfied...

UNTIL, I realized that I still had a crap ton of stuff I wanted up.

A week later, a baby board was born.

I am obviously out of space, sooo I am done with the makeup crafting ;)

It has been super beneficial for me to have this, though. I am using products that I have never touched before, and taking full advantage of the fact that I am very blessed with all of these options!
And the best part is, I actually have room to get ready in the morning!


Wednesday, February 1, 2012

My "Natural" Look- DIY Board teaser & My feature on somethingturquoise.com

Hello loves! So for a few weeks now, I have been wanting to do something about the abundance of cosmetics I have. My makeup box is literally THROWING UP makeup. LOOK AT THIS!!!

This is not even HALF of what I own. This is probably about 15%, in fact. Using everything I own can be an issue, especially when you forget about stuff you own, like eyeshadows or blushes. If you're anything like me, you get bored of the same look, and want to change it up. It makes it easier to do that when you have everything out and in sight, and organized.

Thanks to the magic of Pinterest, I came across an awesome DIY project. Of course I pinned it, but like most pins, you kind of leave it there and forget about it.

Then, today, as I was at work, my friend Ellie who is a majorly crafty person (check out her awesome blog HERE) and I were talking about my stash. She asked "WHY do you need so much in the first place?!" and I said, "Lady, my natural look consists of 4 DIFFERENT LIP PRODUCTS, that's why!"

Oh boy... did reality hit. Seriously, 4 lip products for my "natural" look?! Granted, I wear more than the average woman. What can I say, I'm a makeup artist fo' life. So anyway, after realizing that the amount of product I own will not be tampered with, I have decided to make this board. It is pretty much a magnetic frame that will hold my shadows, blushes and misc. items that I will stick a magnet to. When we finish the final product, I will make sure to post it here.

So back to my natural look. What I wore today totalled 14 items:
Moisturizer- (Super By. Dr. Perricone)
Primer (Super by Dr. Perricone)
Eye Cream (Super by Dr. Perricone)
Cream eyeshadow (Urban Decay- color: Rehab)
Mascara (Maybelline- The Falsies Volum' Express in Very Black)
Tinted Moisturizer (Dermalogica in Light)
Concealer (Studio Fix Fluid, which I use as a concealer, even though it's a foundation. NC 30)
Mineral Powder (Bare Minerals in Med. Beige)
Eyebrow filler (Taupe powder, Trucco)
Blush (Coastal Scents in Redwood, a warm mauve)
and finally, lips-
Lip Primer (Skin Medica Lip Renewal)
Lipstick (MAC's Vegas Volt)
2nd Lipstick (MAC's Ravishing)
Lipgloss (Urban Decay's Lip Junkie in Midnight Cowboy)

PHEWWWW!

Here was my end result:


See, for me, this is the most comfortable I can be without packing on the color. I have very dark under eye circles, pale skin, and no pigmentation on my lips. Many woman feel that I have the gift of applying makeup well, but I feel as though woman have an advantage over me, being able to feel comfortable enough to not have to wear makeup daily.
Truly natural and the option to take it or leave it is the real gift.


On another note, I wanted to share my wedding feature from somethingturquoise.com
I was lucky enough to have this feature done last Saturday, and I was so flattered that Jen picked our wedding!
Here's the direct link:
It's awesome to have all of our hard work recognized :)

That's all for now! Until next time.